Issuing a Customer Refund
StreamV allows approved operators to issue a refund to a customer by identifying the credit memos to be refunded in the AR Invoice Lookup program. If the operator has the appropriate security rights, they may tag one or more than one open negative invoice balance for the customer and select the Issue Refund Check option from the More Menu, to issue the refund. The refund option can be used for refund checks (that you will print on your pre-printed check form), or for refunds that do not require a check (such as cash, wire transfer or credit card refunds).
Note: Each operators ability to issue and or print a refund check is based on security settings. The system will normally default to disabling the refund options. You will receive an error message if you try to use the option and you have not been granted the appropriate security rights.
The Issue Refund Check option may only be used when:
The invoices to be processed are all in your house currency. Refunds may only be processed against invoices when the invoices are in your house currency.
The company name on the invoices being processed is the same. The system will only allow you to issue a refund check when all invoices are for the same company.
The selected invoices have a negative balance. The system will only allow you to issue a refund check against negative invoice balances.
If the selected invoices do not meet the above criteria, the system will display an error message and it will not allow you create a refund check.
The steps for issuing and for printing a refund check are separate.
You can issue a refund without printing a check.
You can issue a refund and print a check at the same time this requires you to have the check printer available on your machine, and it requires you to have the appropriate check form loaded into the printer.
You can issue a refund and you or someone else can print a check later from the AP Check Lookup by Account program this requires the operator printing the check o have the check printer available on their machine, and the appropriate check form loaded into the printer. This option is used when the operator issuing the refund does not have access to pre-printed check forms.
The steps for issuing a refund check are.
1. Verify with your system administrator that you have rights to issue a refund check. Your ability to issue a refund check is based on system policies that can be set by your system administrator.
2. If you will be issuing the customer a refund check on pre-printed check stock, you should reserve an unprinted check in the account that you wish to issue the refund from. Note this check number.
3. Select the AR Invoice Lookup program from the AR Lookups Menu
4. Sort the program by Company and Invoice number, so the invoices and the credits for the company are listed in sequence.
5. Tag (click the Tagging box with the mouse or use the spacebar) the negative open invoice amounts to be refunded.
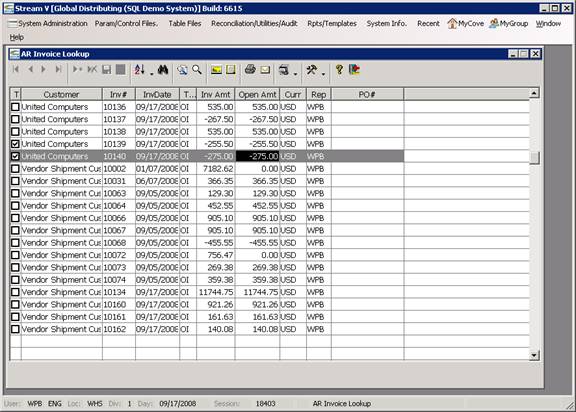
6. Select the Issue Refund Check option from the More Menu on the Standard Toolbar or from the context menu At this point, the system will verify the invoices selected in the AR lookup are valid, and display the Account Description Lookup program or an error message.
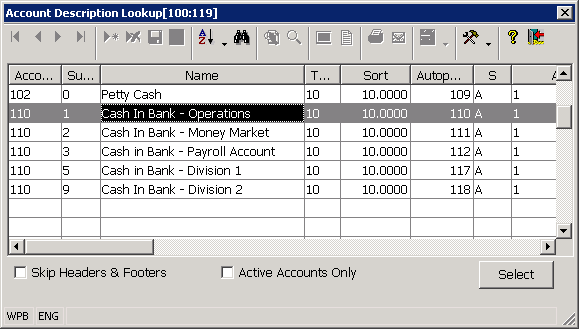
7. Select the Cash Account that the refund check will be issued from. The Account Description Lookup program lists the valid cash accounts that have been set up in your general ledger, and it allows you to select the cash account from which the refund check will be issued.
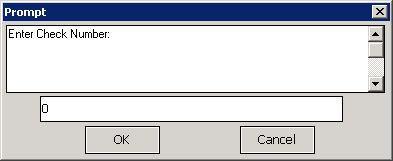
8. Enter the check number to be used for the refund check. Once you have selected a valid cash account in the Account Description Lookupt, the system will prompt for the check number to be used for the refund. This check number should be a numeric value that is unique to the bank account being used. If you will be sending a check to the customer for the refund, the check number should be set to an available un-printed check for the account that is selected for the refund. After the check number to be used has been specified, the system will total up the invoice balances to be refunded and verify that the balance is not 0. If the balance is zero, the system will display an error message and it will not issue the refund check.
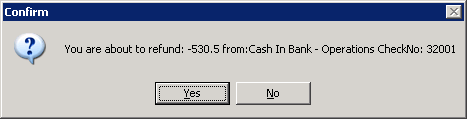
9. Confirm the AR Refund amount, Bank Account and Check number being used. If the refund amount is valid, the system will display a confirmation prompt showing the Refund amount, bank account and check number to be used. You should confirm this information is correct by pressing the Yes Button, or press the No Button to escape without issuing the check.
Once the Yes Button is pressed,
The invoice balances being refunded are closed out.
A record is created in the Bank file to record the refund check issued to the customer. This Bank record has a document type of R (refund) and a source of AR (accounts receivable). The Bank record is created in the cash account selected for the refund and a unique Transaction number is assigned to the Bank record by the system. The amounts in the Bank record are set to the total amount refunded to the customer. These amounts are written as a negative number. The customer on the Bank record is set to the company in the invoices being refunded.
A journal entry is written to record the Bank transaction. This journal entry has a source of AR, and it is posted to the Cash account selected for the refund, and the accounts receivable account that was used for each invoice being processed (based on the AR Autopost number stored in each invoice).
10. Optional: Print the check. If the system parameter F248: ARLUCHKP is set to Y for the operator, the system will notify the operator that the check was created and offer to print the check. If the Yes Button is selected at this point, the system will display the Print Options Object so that you may select the printer to be used for the check. The appropriate check stock and check number should be loaded into the appropriate printer and paper source when the Start Button is pressed in the Print Options object.
Note: An accounts receivable refund check can also be printed from the AP Check Lookup program. This option is used when the operator issuing the refund does not have access to the check form that will be used for the refund.
More:
 Printing an AR Refund Check.