JE Line Editor
The JE Line Editor program is called from the Journal Entry program when you are creating a new journal entry line or are editing an existing journal entry line.
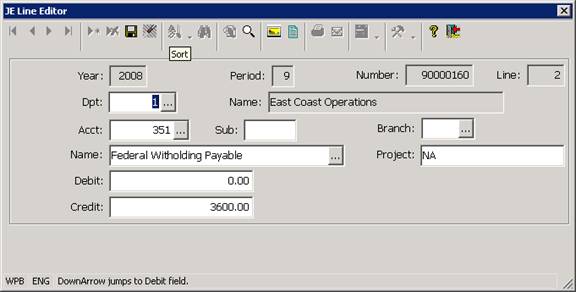
The JE Line Editor is used to specify the Department, Account, Sub account and the debit or credit amounts for each journal entry line. The program also allows you to specify a general ledger project code and a branch code for each line. The project and branch codes can be optional or required based on the validation options you have set up for the fields.
The JE Line Editor is used to add new lines to a new journal entry (by pressing insert in the grid section of the Journal Entry program). The JE Line Editor also allows you to edit any temporary journal entry lines that have been entered into the Journal Entry program but that have not yet been saved or posted to the general ledger (by highlighting the line and using the Zoom option or the Enter key)
The JE Line Editor program displays the year, period, division, and temporary journal entry number for the journal entry line being created. This information defaults from the Header section of the Journal Entry program and may not be changed in the JE Line Editor. The program also contains several fields (described below) which are used when creating or editing a journal entry line in the editor.
Department: The department to be used for each Journal Entry line can be specified using the prompt button in the Department field. When this button is pressed, the system displays the Department Selection List and you may select a valid department from the list. Please note that a single journal entry can be posted to multiple departments but that all of the journal entry lines must be posted to a single division.
Acct:/Sub: The Account and Sub account number to be used for the journal entry line can be selected by using one of the following methods.
You may key the account number (or a portion of it) or the account description (or a portion of it) into the Account or Description fields in the panel and then use the Find keys to scroll through the displayed records until the correct account is displayed,
You can use the Prompt Buttons located next to the Account Number or Account Description fields to display the Account Description Lookup, and select the appropriate account from the Lookup.
You may position the cursor in the Account Number or Account Description fields and use the prompt key (F3) to display the Account Description Lookup, so that you can select a valid account from the Lookup.
Once the appropriate account is selected, you may specify either a debit or a credit amount (only one amount may be specified per line) and an optional project code for the journal entry line (the Project field can be controlled by a Gencode table and may or may not be required based on your system configuration).
After a valid Department, Account and debit or credit amount have been entered, you may save the journal entry line by pressing the Save Key or by using the Save Button. As each journal entry line is created, the system displays the line in the Journal Entry program and it updates the journal entry totals displayed in the lower section of the program. You may not post a journal entry unless you have at least two journal entry lines, and unless the debit and credit totals shown in the program are the same.
More:
 Budget and Forecast Manager